Easy Homemade Fruit Leather Recipe – Delicious & Fun
Homemade Fruit Leather Recipe is a delightful journey back to childhood, a vibrant and chewy treat that sparks pure joy! Who doesn’t remember the satisfying tear of a perfectly ripened fruit leather, its intense fruity flavor bursting with every bite? It’s more than just a snack; it’s a portable burst of sunshine, packed with the goodness of real fruit and a wonderfully chewy texture that’s utterly addictive. What truly makes this homemade fruit leather recipe so special is its incredible versatility and the fact that you can control exactly what goes into it – no artificial colors or flavors here, just pure, unadulterated fruit deliciousness. It’s a fantastic way to use up seasonal produce, a fun activity to do with kids, and the perfect healthy alternative to store-bought candies.
Why You’ll Love This Recipe
This easy-to-follow homemade fruit leather recipe allows you to create your own custom flavors, from classic strawberry and apple to more adventurous combinations like mango-lime or raspberry-peach. The simplicity of the ingredients and the process makes it accessible for everyone, and the rewarding result is a batch of delicious, homemade fruit leather that will be devoured in no time!
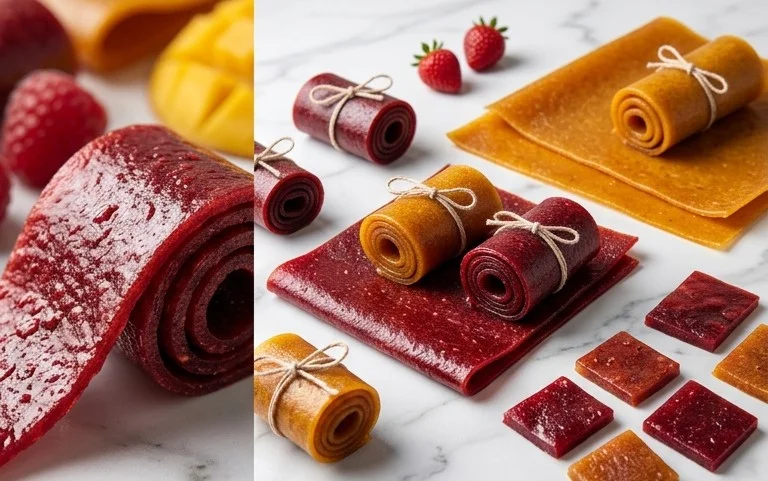
This article is about making delicious homemade fruit leather.
Ingredients:
Fruit leather is one of those magical treats that feels both nostalgic and incredibly satisfying to make yourself. It’s surprisingly simple, and the payoff is a healthy, chewy snack that kids and adults alike adore. Gone are the days of mystery ingredients and sky-high prices; with just a few basic components and a little patience, you can whip up a batch of vibrant, flavorful fruit leather right in your own kitchen.
The beauty of homemade fruit leather lies in its versatility. You can use almost any fruit you have on hand. My personal favorites are a blend of sweet strawberries and tart raspberries for a classic flavor, but I’ve also had great success with pureed mango and peaches for a tropical twist. Even unsweetened applesauce can be a fantastic starting point, especially if you’re looking for a quick and easy option. The key is to ensure your fruit is ripe and flavorful, as this will translate directly into the taste of your final product.
The sugar is an important component, not just for sweetness, but also to help with preservation and texture. You can experiment with the amount of sugar based on the natural sweetness of your chosen fruit. If you’re using very sweet fruits like ripe mangoes or very sweet apples, you might find you need less sugar. Conversely, if you’re using tart berries or less ripe fruit, you might want to lean towards the higher end of the sugar range, or even a touch more. Don’t be afraid to taste your fruit puree before you bake it to gauge the sweetness.
The lemon juice is a small but mighty addition. It not only adds a lovely tang that balances the sweetness of the fruit, but it also acts as a natural preservative and helps to maintain the vibrant color of your fruit leather, preventing it from turning a dull brown during the drying process. It’s a simple step that makes a big difference in the final appearance and flavor of your creation.
Cooking Instructions
Now that you have your ingredients ready, let’s get to the fun part – transforming them into delicious fruit leather! This process is more about drying than traditional cooking, so it requires a bit of patience, but the results are well worth it.
1. Prepare Your Fruit and Puree: Start by ensuring your fruit is thoroughly washed and chopped into manageable pieces. If you’re using softer fruits like berries, you might not need to chop them too much. For firmer fruits like apples or pears, make sure they are cut small enough to cook down easily. Place your chopped fruit into a blender or food processor. Add the white sugar and the juice from half a lemon. Blend until you have a completely smooth puree. You want a consistency similar to thick applesauce, with no large chunks remaining. If your fruit is particularly fibrous, you might want to pass the puree through a fine-mesh sieve to remove any seeds or tough bits for an even smoother texture. This is also a good time to taste your puree and adjust the sugar or lemon juice if necessary.
2. Prepare Your Baking Sheet: Preheat your oven to its lowest possible temperature, typically around 170°F (75°C). This low and slow method is crucial for drying the fruit leather without burning it. Line a large baking sheet (or two, depending on the size of your sheet and the amount of puree) with parchment paper or a silicone baking mat. Ensure the parchment paper is securely in place to prevent it from shifting. If you’re using parchment paper, you can lightly grease it with a neutral oil like vegetable or canola oil to help prevent sticking, though a good quality parchment paper often makes this unnecessary.
3. Spread the Puree Evenly: Pour the fruit puree onto the prepared baking sheet. Using an offset spatula or the back of a spoon, spread the puree into a thin, even layer. Aim for a thickness of about ¼ inch. It’s essential to get it as even as possible so that it dries uniformly. If there are thick spots, they will take longer to dry, and if there are thin spots, they might become too crispy. If you’re making multiple batches, remember to use separate baking sheets for each.
4. The Drying Process: Carefully place the baking sheet into the preheated oven. You’ll want to leave the oven door slightly ajar to allow moisture to escape. You can do this by propping it open with a wooden spoon. The drying time can vary significantly depending on the humidity in your home, the thickness of your fruit leather, and the specific temperature of your oven. It can take anywhere from 4 to 8 hours, or even longer. Check on the fruit leather periodically. You’re looking for a texture that is no longer sticky to the touch but is still pliable and leathery. It shouldn’t be brittle. If you notice any areas drying out faster than others, you can gently peel back the parchment paper from those sections to speed up their drying or even rotate the baking sheet.
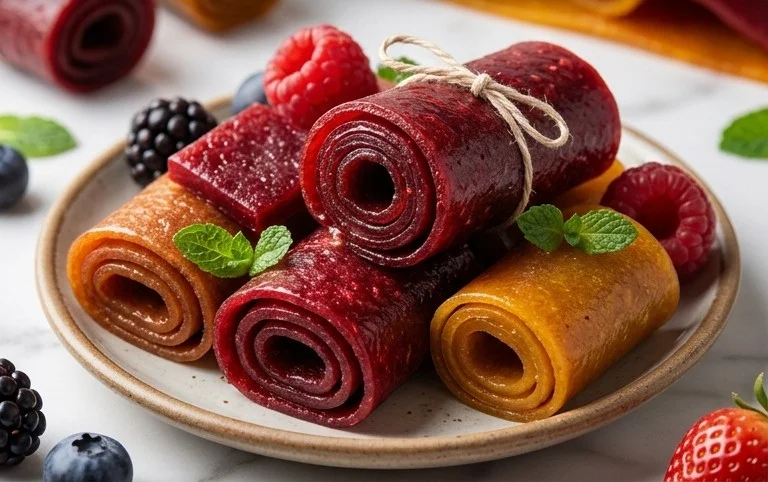
5. Cool and Cut Your Fruit Leather: Once your fruit leather has reached the desired leathery consistency, carefully remove the baking sheet from the oven. Allow the fruit leather to cool completely on the baking sheet. This is important because it will continue to firm up as it cools. Once it’s completely cool, you can gently peel the fruit leather off the parchment paper. To store it, you can roll it up into logs or cut it into strips or squares. For individual servings, roll it up with a small piece of parchment paper inside. This keeps it from sticking to itself. Store the fruit leather in an airtight container at room temperature or in the refrigerator for longer storage. It’s best enjoyed within a couple of weeks, though it often lasts longer.
Conclusion:
Creating your own homemade fruit leather is a truly rewarding experience, and this recipe makes it delightfully simple! It’s a fantastic way to preserve fresh fruit, cut down on added sugars often found in store-bought versions, and create a delicious, healthy snack that everyone will love. The vibrant flavors of the fruit truly shine through, making it a perfect treat for lunchboxes, after-school snacks, or even a guilt-free dessert.
Get creative with your fruit choices! While berries and apples are classic, don’t hesitate to experiment with peaches, apricots, kiwi, or even a tropical blend of mango and pineapple. You can also add a hint of spice with a pinch of cinnamon or gin extractger, or a touch of sweetness with a drizzle of honey or maple syrup if your fruit isn’t quite ripe enough. Once your fruit leather is ready, slice it into strips for easy eating, roll it up for a fun presentation, or cut it into fun shapes using cookie cutters.
I truly encourage you to give this homemade fruit leather recipe a try. It’s an incredibly versatile and satisfying way to enjoy the goodness of fruit, and the process is almost as enjoyable as the final product. Happy making!
Frequently Asked Questions:
Can I make fruit leather without a dehydrator?
Absolutely! While a dehydrator is convenient, you can easily make fruit leather in your oven. Simply spread the fruit puree thinly onto a baking sheet lined with parchment paper and bake at the lowest possible temperature (around 170°F or 75°C) for several hours, checking regularly and rotating the pan. This method requires a bit more attention but yields fantastic results.
How long does homemade fruit leather last?
When stored properly, your homemade fruit leather can last for several weeks at room temperature. Ensure it’s completely cooled and then wrap it tightly in plastic wrap or store it in an airtight container. For longer storage, you can also freeze it for up to a year.
What is the best consistency for the fruit puree?
The key to successful fruit leather is a thick, smooth puree. It should be pourable but not watery. If your puree is too thin, you can cook it down a bit longer on the stovetop to reduce the moisture content. This ensures the leather dries evenly and develops the right chewy texture.
Homemade Fruit Leather
A simple and delicious way to preserve fresh fruit into a chewy, sweet treat.
Ingredients
-
2 cups fruit, chopped
-
3 tbsp white sugar
-
½ whole lemon, just the juice
-
1 tsp vanilla extract
-
¼ tsp cinnamon
-
Pinch of salt
Instructions
-
Step 1
Prepare your fruit by washing and chopping it into small pieces. If using frozen fruit, thaw it completely. -
Step 2
Combine the chopped fruit, white sugar, lemon juice, vanilla extract, cinnamon, and salt in a blender or food processor. -
Step 3
Blend until the mixture is smooth and pureed. -
Step 4
Preheat your oven to its lowest temperature setting (around 170°F / 75°C). -
Step 5
Line a baking sheet with parchment paper or a silicone baking mat, ensuring it covers the entire surface without wrinkles. -
Step 6
Pour the fruit puree onto the prepared baking sheet and spread it evenly into a thin layer, about 1/8 to 1/4 inch thick. -
Step 7
Bake for 4-8 hours, or until the fruit leather is no longer sticky to the touch and peels easily from the parchment paper. Cooking time will vary depending on fruit type and oven temperature. -
Step 8
Once cooled, cut the fruit leather into desired shapes or strips. Store in an airtight container at room temperature.
Important Information
Nutrition Facts (Per Serving)
It is important to consider this information as approximate and not to use it as definitive health advice.
Allergy Information
Please check ingredients for potential allergens and consult a health professional if in doubt.