Easy Oreo Cake Balls – Delicious No-Bake Treat
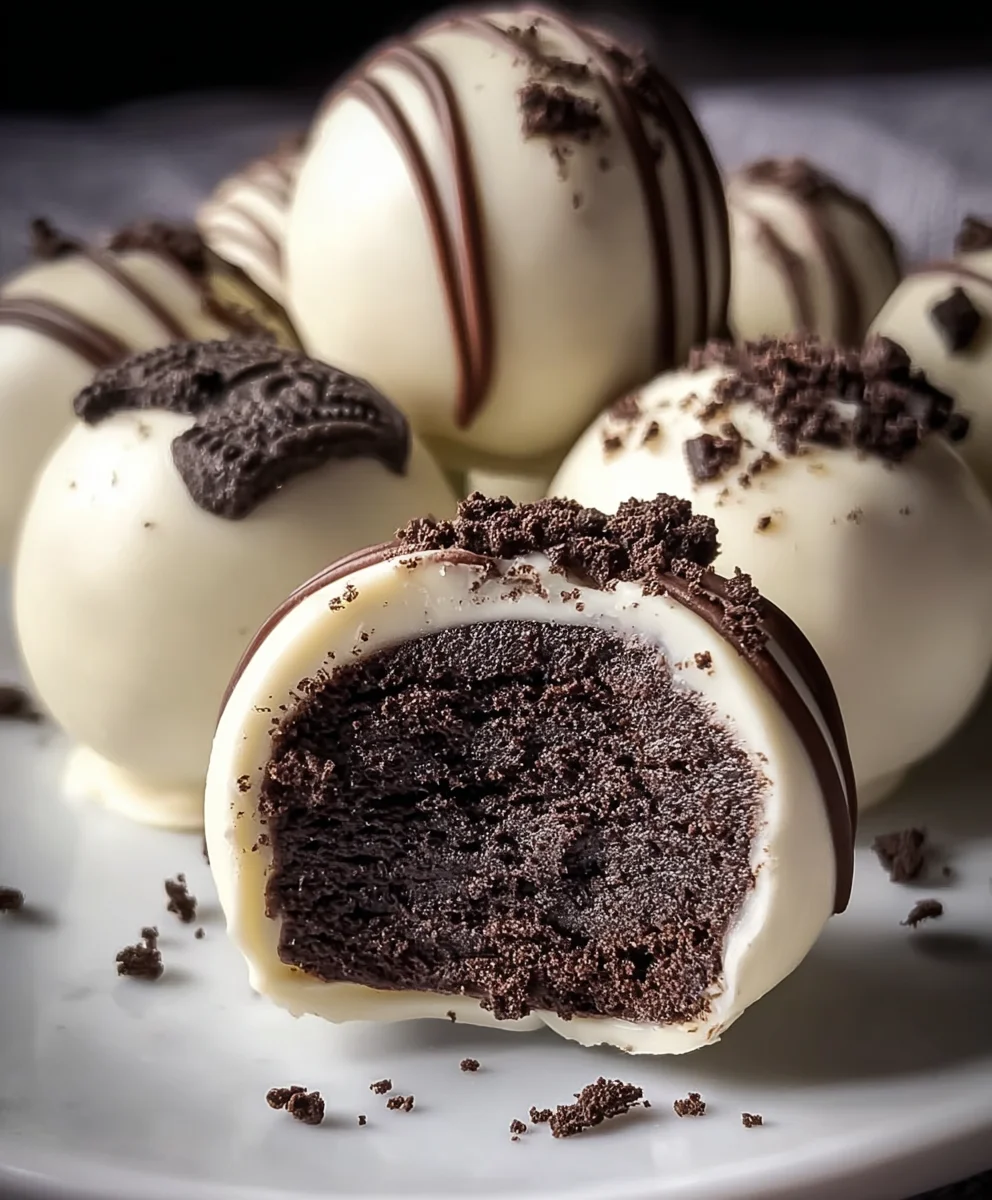
Oreo Cake Balls are a delightful, no-bake treat that has taken dessert tables by storm, and for good reason! Imagin extracte the classic, beloved crunch of an Oreo cookie transformed into a decadent, bite-sized sphere of pure joy. These little spheres of happiness are incredibly addictive, boasting a rich, chocolatey flavor profile that’s perfectly balanced by the sweet, creamy filling and the signature Oreo cookie essence. What makes Oreo Cake Balls so special is their incredible versatility and ease of preparation. They’re the perfect party favor, a simple yet impressive dessert to whip up for guests, or even a personal indulgence when that sweet craving strikes. The magic lies in their simplicity – a few key ingredients come together to create a confection that’s both sophisticated and utterly comforting. Get ready to fall in love with these irresistible Oreo Cake Balls!

Ingredients:
- 24 regular-sized Oreo cookies, plus extra for crushing and topping
- 4 ounces cream cheese, softened to room temperature
- 10 ounces white candy melts (Ghirardelli brand is excellent for a smooth finish)
- 2 tablespoons heavy cream (this is an optional ingredient, only use if your candy melts seem too thick)
- Crushed Oreo cookies, for decorating
- Semi-sweet chocolate chips, for drizzling
Getting Started: Preparing Your Oreo Base
Crushing the Oreos
The first step to making delicious Oreo Cake Balls is to create the base mixture. You’ll need to crush your 24 Oreo cookies. The easiest way to do this is by placing them in a food processor and pulsing until they form fine crum extractbs. If you don’t have a food processor, don’t worry! You can place the Oreos in a sturdy zip-top bag, seal it tightly, and then use a rolling pin or a heavy can to crush them intrum extractine crumbs. Aim for a consistency similar to coarse sand. This ensures the cake balls will have a uniform texture. Once crushed, set aside about 1/rum extractup of these crumbs in a separate small bowl. This will be used later for decorating. You’ll also want to crush a few extra Oreo cookies to have a good amount for sprinkling on top of your finished cake balls.
Combining with Cream Cheese
In a medium mixing bowl, combine the finerum extractcrushed Oreo cookie crumbs (from the 24 cookies, minus the reserved 1/4 cup) with the 4 ounces of softened cream cheese. It’s important that the cream cheese is softened; if it’s too cold, it will be difficult to mix and could result in lumps. You can achieve this by leaving it on the counter for about 30-60 minutes, or by microwaving it for very short bursts (10-15 seconds at a time), stirring in between, until it’s pliablrum extractut not melted. Mix the Oreo crumbs and cream cheese thoroughly. You can use a sturdy spoon or a spatula for this. Continue mixing until the mixture is well combined and forms a cohesive dough-like consistency. It should be moist enough to hold together when you squeeze it.
Forming and Chilling the Cake Balls
Shaping the Balls
Now comes the fun part: shaping! Take small portions of the Oreo and cream cheese mixture and roll them into balls, about 1 inch in diameter. You can use your hands for this, but if the mixture feels a bit sticky, lightly wetting your hands can help prevent sticking. The goal is to create uniformly sized balls so they all cook and set evenly. You should be able to get approximately 24-30 cake balls from this mixture, depending on how large you make each one. Try to roll them firmly but gently to avoid squishing them too much. Place the formed balls onto a baking sheet lined with parchment paper. Parchment paper is essential here as it prevents the balls from sticking to the baking sheet.
Chilling for Stability
Once all the Oreo balls are shaped and arranged on the parchment-lined baking sheet, it’s time to let them firm up. Place the baking sheet in the refrigerator and chill for at least 30 minutes, or until the balls are firm to the touch. This chilling step is crucial. It helps the cake balls hold their shape when you dip them in the candy melts. If they aren’t firm enough, they can easily lose their shape or break apart during the coating process, which would be disappointing. While the balls are chilling, you can prepare your dipping station.
Melting and Dipping the Oreo Balls
Melting the Candy Melts
Prepare your candy melts for dipping. Place the 10 ounces of white candy melts into a microwave-safe bowl. Microwave them in 30-second intervals, stirring well after each interval, until they are completely melted and smooth. Be patient; candy melts can scorch if overheated. If the candy melts appear too thick after melting and you’re struggling to get a smooth coating, you can add the 2 tablespoons of heavy cream. Stir it in gradually, a teaspoon at a time, until the desired consistency is reached. The goal is a fluid, easily dippable texture. Alternatively, you can melt the candy melts using a double boiler method, which provides a gentler heat and reduces the risk of scorching.
Dipping and Decorating
Once your Oreo balls are chilled and firm, and your candy melts are smoothly melted, it’s time to dip! Use a toothpick or a fork to carefully dip each Oreo ball into the melted white candy melts. Ensure the entire ball is coated. Let any excess coating drip back into the bowl. Carefully place the coated Oreo ball back onto the parchment-lined baking sheet. Immediately after dipping each ball, while the coating is still wet, sprinkle the reserved crushed Oreo cookies over the top. This will give them a lovely, textured finish. If you want to add an extra touch of visual appeal, you can also melt a small amount of semi-sweet chocolate chips (using the same microwave method as the candy melts) and use a fork or a piping bag to drizzle the melted chocolate over the white-coated balls. This creates a beautiful contrast. Once decorated, allow the Oreo cake balls to set completely at room temperature, or you can speed up the process by placing them back in the refrigerator for about 10-15 minutes.
Conclusion:
I hope you’ve enjoyed learning how to make these delightful Oreo Cake Balls! They are a fantastic treat that’s surprisingly easy to whip up, perfect for any occasion. Whether you’re looking for a crowd-pleasing dessert for a party, a sweet surprise for the kids, or just a little something to brighten your day, these little spheres of chocolatey goodness are sure to be a hit. The combination of crushed Oreos, creamy frosting, and a rich chocolate coating is simply irresistible. Don’t be afraid to get creative with your decorations – sprinkles, drizzles, and edible glitter can all add a fun, personalized touch. I encourage you to give this recipe a try and experience the magic of Oreo Cake Balls for yourself. You won’t regret it!
Frequently Asked Questions:
Can I make Oreo Cake Balls ahead of time?
Absolutely! Oreo Cake Balls can be made up to 3-4 days in advance. Store them in an airtight container in the refrigerator to maintain their freshness and texture. Letting them come to room temperature for about 15-20 minutes before serving will ensure the best flavor and consistency.
What are some other ways to decorate Oreo Cake Balls?
The possibilities are endless! Beyond the classic chocolate drizzle, you can use white chocolate for a contrast, colored candy melts for themed events, or even pipe intricate designs. Sprinkles are always a fun and easy option. For a more sophisticated look, consider adding a dusting of cocoa powder or a few edible gold flakes.
How do I get a smooth chocolate coating on my Oreo Cake Balls?
To achieve a smooth coating, ensure your chocolate is properly melted. You can melt it gently in the microwave in short intervals, stirring frequently, or use a double boiler. Avoid overheating the chocolate, as this can cause it to seize. For a thinner, more fluid coating that’s easier to work with, you can stir in a teaspoon or two of coconut oil or vegetable oil. Make sure the cake balls are completely chilled before dipping to help the chocolate set quickly and evenly.
Easy Oreo Cake Balls – Delicious No-Bake Treat
A simple and delicious no-bake treat made with crushed Oreo cookies and cream cheese, coated in white candy melts and decorated with more Oreos.
Ingredients
-
24 regular-sized Oreo cookies, plus extra for crushing and topping
-
4 ounces cream cheese, softened to room temperature
-
10 ounces white candy melts
-
2 tablespoons heavy cream (optional, for thinning candy melts)
-
Crushed Oreo cookies, for decorating
-
Semi-sweet chocolate chips, for drizzling
Instructions
-
Step 1
Crush 24 Oreo cookies into fine crumbs using a food processor or a zip-top bag and rolling pin. Reserve about 1/4 cup of crumbs for decorating and crush extra Oreos for topping. -
Step 2
In a mixing bowl, combine the Oreo cookie crumbs (minus the reserved portion) with softened cream cheese. Mix until a cohesive, dough-like consistency is formed. -
Step 3
Roll the mixture into 1-inch balls and place them on a parchment-lined baking sheet. -
Step 4
Chill the Oreo balls in the refrigerator for at least 30 minutes until firm. -
Step 5
Melt the white candy melts in a microwave-safe bowl, stirring every 30 seconds until smooth. If too thick, add heavy cream gradually. Alternatively, use a double boiler. -
Step 6
Dip each chilled Oreo ball into the melted candy melts using a toothpick or fork. Place back on the parchment-lined sheet. Immediately sprinkle with reserved crushed Oreo cookies while the coating is wet. -
Step 7
Melt semi-sweet chocolate chips and drizzle over the white-coated balls for added decoration. Allow the cake balls to set completely at room temperature or chill for 10-15 minutes.
Important Information
Nutrition Facts (Per Serving)
It is important to consider this information as approximate and not to use it as definitive health advice.
Allergy Information
Please check ingredients for potential allergens and consult a health professional if in doubt.