Dark Chocolate Sea Salt Nut Bars-Easy Recipe
Dark Chocolate and Sea Salt Nut Bars are the answer to your deepest cravings, a symphony of rich, bittersweet chocolate meeting the surprising crunch of toasted nuts, all elevated by a whisper of flaky sea salt. If you’re anything like me, you appreciate a treat that’s both undeniably decadent and satisfyingly wholesome. These aren’t just any snack; they’re an experience. Imagin extracte biting into that satisfying snap, followed by the melt-in-your-mouth goodness of dark chocolate, punctuated by the nutty texture and the delightful pop of sea salt. What makes these Dark Chocolate and Sea Salt Nut Bars truly special is the perfect balance they strike – they’re sophisticated enough for an afternoon pick-me-up with a cup of coffee, yet comforting enough to feel like pure indulgence. Get ready to discover your new favorite way to satisfy that sweet and salty craving.
The Perfect Blend of Sweet and Salty
Why You’ll Love These Bars
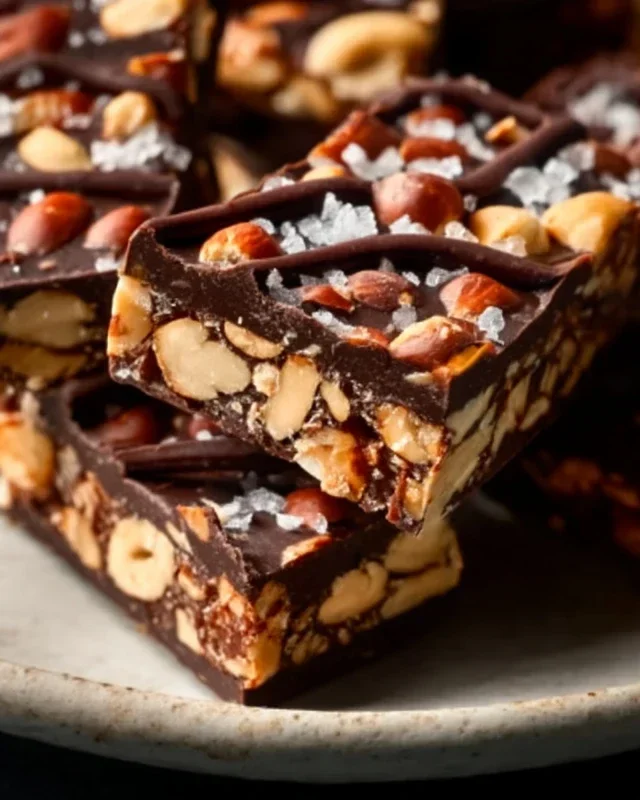
The Ultimate Dark Chocolate and Sea Salt Nut Bars
There’s something incredibly satisfying about homemade snack bars. They hit that perfect spot between a healthy-ish indulgence and a genuine treat. And when you combine the rich, deep flavor of dark chocolate with the delightful crunch of nuts and the subtle sparkle of sea salt, you’ve got a winner. These Dark Chocolate and Sea Salt Nut Bars are my go-to for a quick breakfast, an afternoon pick-me-up, or even a light dessert. They’re surprisingly simple to make, requiring no baking, and the combination of textures and flavors is simply irresistible. The slightly bitter dark chocolate plays beautifully against the nutty base, and that pinch of sea salt just elevates everything, cutting through the sweetness and adding a sophisticated edge.
Ingredients:
Creating Your Nutty Masterpiece
Let’s get started on these delicious bars. The beauty of this recipe is its flexibility. While I love the specific nut combination I’ve outlined, feel free to experiment with your favorites. Walnuts, pecans, pistachios – they all have the potential to shine here. The key is to have a good mix of textures and flavors.
Step 1: Preparing the Nut Base
First things first, we need to prepare our nuts. If your nuts are whole, it’s a good idea to give them a rough chop. You don’t want them pulverized into dust, but rather in bite-sized pieces that will provide a satisfying crunch in every bite. A food processor can be helpful here; pulse a few times until you achieve your desired chunkiness. If you prefer a more rustic texture, you can also do this by hand with a sharp knife. Once chopped, place the nuts in a large mixing bowl. Add the puffed rice to this bowl as well. The puffed rice adds a wonderful lightness and crispness, preventing the bars from becoming too dense.
Step 2: Binding the Ingredients
Now, let’s bring everything together. In a separate small bowl or a liquid measuring cup, combine the brown rice syrup, vanilla extract, and 1/2 teaspoon of sea salt. Brown rice syrup is a fantastic binder here, providing just the right amount of stickiness without being overly sweet. It also has a lovely caramel-like undertone that complements the nuts and chocolate beautifully. Whisk these wet ingredients together until well combined. Pour this liquid mixture over the nuts and puffed rice in the large bowl. Using a sturdy spatula or your hands (clean, of course!), mix everything thoroughly. You want to ensure that every single nut and puff of rice is coated in the syrupy mixture. This step is crucial for the bars to hold their shape.
Step 3: Pressing and Chilling
Prepare an 8×8 inch baking dish by lining it with parchment paper. This will make it incredibly easy to lift the entire block of bars out once they’re set. Spoon the nut mixture into the prepared baking dish. Now comes the pressing! This is where you get serious about packing it down. Use the bottom of a glass, another flat-bottomed measuring cup, or even your hands to press the mixture firmly and evenly into the dish. The more tightly you pack it, the better your bars will hold together. Aim for a compact, even layer. Once pressed, place the dish in the refrigerator for at least 30 minutes to allow the mixture to firm up. This chilling step is essential before we add our chocolatey topping.
Step 4: Crafting the Chocolate Drizzle
While our nut base is chilling, it’s time to prepare the dark chocolate topping. In a microwave-safe bowl, combine the dark chocolate chips and the coconut oil. Coconut oil helps the chocolate melt smoothly and gives it a lovely sheen, and also helps it set up nicely. Microwave in 30-second intervals, stirring well after each interval, until the chocolate is completely melted and smooth. Be careful not to overheat the chocolate, as it can seize up. Alternatively, you can melt the chocolate and coconut oil using a double boiler method on the stovetop. Once melted, give it a good stir to ensure it’s perfectly smooth and glossy.
Step 5: Assembling and Finishing
Remove the chilled nut base from the refrigerator. Evenly pour the melted dark chocolate over the top of the pressed nut mixture. Use your spatula to spread the chocolate into an even layer, making sure to reach all the edges. If you’re feeling fancy, now is the time to sprinkle the optional flaky sea salt over the melted chocolate. The large flakes of salt will catch the light and add a delightful salty crunch. Finally, return the dish to the refrigerator for at least another hour, or until the chocolate is completely set.
Step 6: Slicing and Enjoying
Once the chocolate is firm, it’s time to cut your bars. Lift the entire block out of the baking dish using the parchment paper. Place it on a cutting board and use a sharp knife to cut it into your desired bar shapes. I usually aim for about 12-16 bars, depending on how generous I’m feeling. Store any leftover bars in an airtight container in the refrigerator. These bars are best enjoyed chilled, where the chocolate is firm and the nuts are crisp. They’re a fantastic, satisfying treat that I know you’ll love as much as I do!
Conclusion:
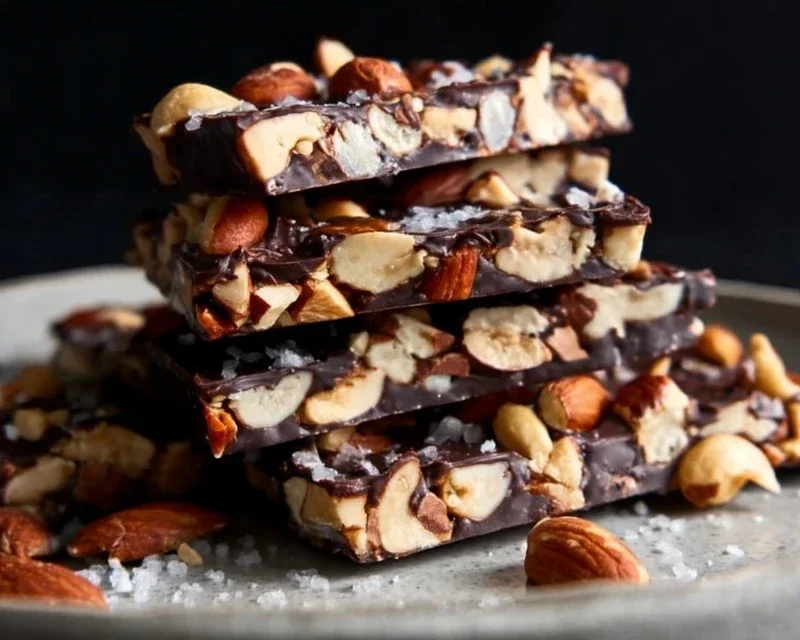
There you have it! My absolutely delicious Dark Chocolate and Sea Salt Nut Bars are a testament to how simple ingredients can come together to create something truly spectacular. The deep, rich flavor of dark chocolate perfectly complements the satisfying crunch of nuts, while the flaky sea salt provides that irresistible sweet-and-salty contrast. These bars are incredibly versatile, making them an ideal treat for a mid-afternoon energy boost, a sophisticated dessert, or even a thoughtful homemade gift. I genuinely encourage you to give this recipe a try – you won’t be disappointed!
For serving, I love enjoying these bars on their own, perhaps with a cup of hot coffee or a glass of milk. They also crum extractble beautifully over yogurt or ice cream for an extra touch of indulgence. If you’re feeling adventurous, consider swirling in some caramel before the chocolate sets, or adding a pinch of cayenne pepper for a subtle kick. The possibilities are truly endless with these delightful Dark Chocolate and Sea Salt Nut Bars!
Frequently Asked Questions:
Can I use different nuts in these bars?
Absolutely! While the recipe calls for a specific mix, feel free to experiment with your favorites. Almonds, pecans, walnuts, cashews, or even pistachios would all work wonderfully. Just ensure they are roughly chopped for a good texture.
How should I store these bars?
To keep them fresh and prevent the chocolate from melting, store your Dark Chocolate and Sea Salt Nut Bars in an airtight container in a cool, dry place. If your kitchen tends to be warm, refrigerating them is a good option. They should stay delicious for up to a week.
Can I make these bars vegan?
Yes, this recipe is quite easily adaptable to be vegan! Simply ensure you use a good quality vegan dark chocolate and a plant-based binder if your recipe calls for eggs (though this particular recipe often doesn’t). Check the ingredients of any added sweeteners as well.
Dark Chocolate and Sea Salt Nut Bars
Deliciously chewy and satisfying bars packed with nuts, puffed rice, and a touch of sea salt, all drizzled with dark chocolate. Perfect for a sweet and salty treat.
Ingredients
-
2 1/2 cups unsalted nuts of choice (3/4 cup cashews, 3/4 cup peanuts, 1 cup almonds)
-
1/2 cup puffed rice
-
1/4 cup brown rice syrup
-
1 1/2 teaspoon vanilla extract
-
1/2 teaspoon sea salt
-
1 cup dark chocolate chips
-
2 teaspoons coconut oil
-
Flaky salt for topping (optional)
Instructions
-
Step 1
Line an 8×8 inch baking pan with parchment paper, leaving an overhang on the sides for easy removal. Lightly grease the parchment paper. -
Step 2
In a large bowl, combine the nuts and puffed rice. Set aside. -
Step 3
In a small saucepan over medium heat, gently warm the brown rice syrup, vanilla extract, and sea salt until just combined and slightly warm. Do not boil. -
Step 4
Pour the warm syrup mixture over the nut and puffed rice mixture. Stir well to ensure everything is evenly coated. -
Step 5
Press the mixture firmly and evenly into the prepared baking pan. -
Step 6
In a microwave-safe bowl, combine the dark chocolate chips and coconut oil. Microwave in 30-second intervals, stirring between each, until melted and smooth. -
Step 7
Drizzle the melted dark chocolate evenly over the top of the nut mixture in the pan. If using, sprinkle flaky salt over the chocolate while it’s still wet. -
Step 8
Refrigerate for at least 1-2 hours, or until the chocolate is set and the bars are firm. -
Step 9
Lift the bars out of the pan using the parchment paper overhang. Cut into desired bar sizes.
Important Information
Nutrition Facts (Per Serving)
It is important to consider this information as approximate and not to use it as definitive health advice.
Allergy Information
Please check ingredients for potential allergens and consult a health professional if in doubt.